Tuesday, December 4, 2012

T'is The Season

I was shopping for Christmas decorations/craft ideas at Michael's and I decided that I wanted to make my own Christmas Wreath this year. I took a look at their pre made wreaths and got some ideas. It was a good thing there was a Dollar Store next door because Michael's can get a nit pricey. I picked up:
  • Styrofoam ring. 
  • Any type of  festive decorations you want to decorate your wreath with.
  • Glue Gun
  • Real or fake cedar bows


Here are examples of the festive decorations I bought.

Getting Ready:
Take everything out of the packaging lay it out and get a idea of how you want to decorate your wreath.

Get Started:
  • Wrap the cedar bows around the Styrofoam ring until it is covered. Tip: if you have bald spots, don't worry because you can cover them with the decorations. 
  • Then use a hot glue gun to stick your decorations on your bare wreath. Remember there is no right way to do this. Get funky and do what ever you think looks good!

If you feel like you can't do this on your own there are wreath making workshops offered, however they can get pricey.

This is what my final product looked like however feel free to add your own touch to it and get creative.


Wooden Snowmen

I come from a small farming community just over an hour outside of Calgary.  Every year for forever our town has hosted a Turkey supper at the beginning of November.  Along with this we have a Bazaar.  My church always has a candy and craft table.  One year one of the farmers ripped up an entire section of fencing and had all these wooden posts that he didn't know what to do with.  His wife came up with the idea of making them into little snowmen and selling them at the Bazaar.  These snowmen are really easy to make.  We even went a step further and grouped them into little family's as well.

To make these snowmen you will need:
-pieces of wood (as many as is in your family) it doesn't have to be fence posts (about two feet high and varying sizes)
-white and black paint
-some old plaid material
-orange cloth (for the nose)
-some buttons
-nails
-some old wool socks

First you have to paint the wood white.  We only did one coat so you could still see the wood through it but you can put on as many coats as you want.  Taking the old wool socks you want to cut the toes off and use them as a toque for the snow men.  The old plaid material is for the scarves of the snowmen.  You can cut the material and tie it on however you want.  I suggest hot glue gunning the toque and scarf onto the snowman so that they don't fall off.  You can then take a couple of the buttons and nail them onto the snowman.  You can then paint black eyes and a smile on to your snowman.  To make the nose you first have to hammer a nail into the post where you want the nose to be.  Then cutting a triangular piece out of the orange material hot glue the material onto the nail so that they snowman has what looks like a carrot nose.  If you have done a family snowmen what we did was use barb wire and looped it around the little family.  You can use whatever you want or you don't have to tie them together.  I wish I was at home so I could show you what mine looks like but here is a similar one that I found on Pinterest.
They are so cute for winter and you can put them outside or keep them inside.  Its up to you!

Surreal


I was snooping around on the Internet and came across this website.  It was titled the Surreal,Infrared Photography of David Keochkerian.  These pictures are so cool. 

David doesn’t just use infrared to capture his images.  There are other photographs where he has used a slower shutter speed.  He calls these his Spark Art photographs. 


These pictures are so cool.  Unfortunately I couldn’t find a biography on David but found some other sites that have even more of his surreal pictures on them.  

I love these photographs.  Even without the special affects that David uses these pictures are so cool. But with these special affects they turn a photo into something unique and different.  I am definitely going to try and find David on Facebook so that I can see more of these cool photographs.  

CANDLES

Because school is getting hectic with it being the end of the year, I didn't have time to make my candles yet. However I did go out and purchase all the materials needed to make them.  Im going to make my candles in Mason jars to give it that rustic look, which I purchased at the dollar store. 

What you need:
  • Wax
  • Wicks
  • crayons (a cheap way to dye the wax) or you can buy the dye
  • Jars or molds
  • Spoon for mixing
  • Go through you recycling and get some used but clean cans. You will need one can per color.
  • Scent
  • Pot to boil water
Get Started:
  • Put 2 inches of water in your pot and bring it to a boil.
  • Cut your wax so it fits into the cans.
  • Once the water is boiled put the cans with the wax in them in the water.
  • Once the wax melts add your color to the melted wax and wait for it to melt and mix it in.
  • If you didn't buy wax dipped wick, cut the wick longer than your candle will be and dip it in the wax and place it into the fridge to cool.
  • Pour your candles into the mold or jar and place in the fridge.
  • Keep a close eye on them and once they start to get hard place the wick in the candle.
After:

If you happened to get messy don't sweat it. Lay a brown bag or old sock over the spill. Use an iron, set  it on high to melt the wax onto the paper bag or sock and VOILA!

Remember:
  • Wax is very hard to clean up from counters. So cover EVERYTHING in newspaper.
  • Wax is flammable, so be careful.


I thought that these candles would be the perfect gift idea for those who have everything already and you have no idea what to get them, also it is more sentimental because its homemade. I hope my candle making goes well and if you guys have any tips for me that would be great!

Child's play

Hobbies:
There are so many interesting hobbies out there that people take on to keep themselves busy or to take their mind off of things.

On the week days I work at a youth drop in center for the City of Calgary, which may I add is pretty much the best job out there because I get to hangout and play all day.
Recently the kids have taken an interest in cup stacking. I have not heard of speed stacks before however it has been around for a lot longer than I thought. Cup stacking started in the 1980's and has grown into a huge sensation and apparently it's become a huge craze among the kids that I work with.

The other day I swear they were at it for hours before they invented there own "cup music" which is shown in the video down below:


It really surprised me how creative they were and it only took 30 minutes to perfect this. 

Feedback :)

Feedback 

(By: FOURHALF Inc, retrieved Dec 4 from: http://tx.english-ch.com/teacher/trina/level-a/talking-to-strangers/)


Joy is such a hard thing to come by now a days and with the stress of school, work and relationships, life seems incredibly stressful. It  always seems as if one wall after another is put in your path to deter you from finding fulfillment and happiness. Now I have not discovered the ultimate cure to solving this problem however, I have found something that brings me great joy and gratitude when I sit down to my computer. I recently have started getting feedback and responses the more that I become immersed in the blogger mentality and culture. I do not have a large social network presence and thus I have a lack of connection with people online. Due to the necessity in this class to post on other individuals blogs it has allowed me to gain a huge appreciation for the online culture and the essential aspect of feedback. Getting recognized for your work or ideas proves to be incredibly rewarding and an online setting as it is the perfect place to receive this recognition. There is a strong feeling of respect and admiration when sharing ideas with your peers and it seems as if it could be an essential reason for online culture.

Through all social networking and sharing one can get a deep connection to others even through a monitor. I have recently started to get more involved on other social networking platforms such as linkedin, facebook and youtube, and this has proved to be greatly beneficial to me. I have expanded my business network and met some new people, just by being open to involvement in an online environment. As an example I recently met a student living in Africa on facebook and we have since been talking back and forth in a pen pal fashion. This experience has not only taught me about online culture but also culture from places around the world. These experiences have taught me the skills I need to be successful environment and how truly beneficial cyber culture can be. I now feel as if my metaphorical walls have come down and I am incredibly motivated to continue to pursue further connections, with other internet users.


 Thanks for all the continued feedback as I now have a greater appreciation for all aspects of the blogger mentality.


Is Disc Golf Art?

Is Disc Golf Art?


Recently over the summer I discovered an amazing game that involves precision, skill and patience. Disc Golf proves to be an amazing pastime and in the last couple months I have become completely immersed in the sports culture. Now for those of you who don't know about disc golf, it is a game in which one must throw a specialized frisbee into a chain basket. It is very similar to ball golf but with a couple variations. Instead of having different clubs for puts, drives and approaches , there are different discs for each type of shot. Instead of a hole being 300 yards away, disc golf holes are 300ft away. In disc golf it doesn't matter how the disc gets to the basket as long as it was thrown from behind the previous shot. Perhaps the largest change when looking at disc golf is the curve or fade of the flight pattern that allows players to shoot around obstacles. This is my driving factor for loving disc golf and as you see your driver bend perfectly around a enormous evergreen, one gets the most satisfying feeling of accomplishment.

Now as for my connection to disc golf, I was introduced to it through a family friend who would take me out to play with him. Since this start I have purchased my own set of discs, competed in amateur disc golf competitions and even built my own basket in my backyard. I find it as a very incredible stress relief to go out and play 18 holes with no one but mother nature and it proves to be greatly beneficial.


In relation to the subject of art and design disc golf and fit the bill quite well as everything involved in the game entails a lot of artistic expression. This expression is most noticeable when look at the large variety of discs that exist. They are all shaped just a little differently and the discs come in all colors of the rainbow and beyond. As well as bright vibrant colors, the discs are plastered with original designs stamped straight onto the face. With product names such as Buzz kill, Vulcan, Whippet and Destroyer, any newcomer can start to see were these design inspirations come from. This art factor in an already great game just solidifies my need to continue to pursue disc golf and makes me want to continue to pursue this fantastic passion.  


(Image #1 retrieved Dec 3 from: http://en.wikipedia.org/wiki/File:Disc_golf_in_basket.JPG)

Tattoo Culture

Tattoo Culture


Recently when going on any social networking platform one can see a very large presence of tattoo images and culture being portrayed across the internet. Instagram, facebook and youtube all have users, pages and groups centered around the culture of tattoos. Individuals can post their own tattoo pictures, see others and even visit the online portfolios of artists. Not only has there been a shift towards everyone and their mother getting tattoos, but there has been a inspiration derived from tattoos in all aspects of North American culture. With the fad of Ed Hardy clothing gaining huge popularity over the last couple years, one can see the depiction of tattoos everywhere. Tattoo culture in an online setting is just a great example how sparking public interest in a social networking setting, can be incredibly beneficial in creating publicity for an otherwise underground art form.


However on the other end of the spectrum this large public interest causes one to assess the true reason why some individuals get inked. Do people just fall into the clinch of peer pressure and feel the need to get them, or is it a meaningful reminder permanently embedded into the skin. I would argue that this all depends on the individual, but I believe that now more than ever with social culture jumping on the tattoo bandwagon, that people just make impulse decisions when getting tattoos. For example I had someone tell me the other day that it was about time they went and got a new tattoo, and being intrigued by this I asked the logical question of, what do you want to get? and Why? For both of these questions I couldn't get a response which truly perplexed me. It was just something they wanted and it seems to me that the perception of a tattoo has changed. Tattoos have started to lose the profound meaning and symbolism they had once attained. They are now a piece of artwork that is etched into skin for materialistic reasons. Now is this just the evolution of art form or is this even a change from what it was before? I guess it all depends on the eyes of the beholder and it seems that tattoos will continue to be a dominant aspect of all cultures.

Hitachi DS 18DFL Review

The Green Mean Machine

Unfortunately I have and unusual tendency when buying powers tools to use in the garage. I look more at the design of the tool rather than its actual functionality. This also proves to be detrimental to my bank account as most of the time the better looking the tool is the more expensive tool. The yellow body with black accents of a Dewalt drill is almost magical in the way it grabs your attention as you walk buy. As I am still too frugal to spend the big money on the Dewalt brand, I did purchase a tool set by Hitachi that could satisfy both my needs for a power tool that will preform its job and its design aspects. I am going to preform a review of this purchase and I will attempt to discover whether it was worth the big money.


Design:  5/5
Speed:   4.5/5
Torque: 4/5
Price:     5/5_
Total:     4.5/5


The Hitachi DS 18DFL proves to be an excellent product with great design features. Its lithium ion battery provides long lasting power to provide constant working loads. It has many different torque settings all adding great value to this great tool. One of the best features about this product is its ability to remain light weight, while still maintaining the power of an 18V drill. Where as I had originally bought this product mainly based on its looks, it also proves to be a great product. It has worked time and time again for me even when making some difficult and intricate art projects with it. I would recommend this product to any and all individuals looking for a stylish, fully functional cordless drill. It has proved itself in my eyes and I am sure it will continue to do so.


Monday, December 3, 2012

Ragtime Quilting

If you are cold person, then quilting could be the past-time for you. I have made a few quilts in my past, and currently decided to take on a ragtime quilt. These quilts are so cozy to cuddle up with on the couch that they are nap inducing. It is always a challenge for me not to fall asleep once I've nestled underneath a ragtime, especially since I am cold so often. Therefore, I figured this would be the perfect project for me to take on next.

The reason why they are called ragtime quilts is because the seams are not sewn into the quilt. They are left exposed and are cut so that they fray as they are washed and used, giving them a "rag" effect. Majority of the time they are made of flannel, but sometimes they are made from cotton. I chose to use flannel for mine because of how soft and cozy it is. I chose my fabric from a store called Hamels that is based out of my hometown in Chilliwack, BC, but has an online store as well. They have a great selection and so many colours and kits to choose from!

My aunt's ragtime- what mine will hopefully look like when I am finished!
Photography by Kathryn Slack
So far on my quilt, I have cut out the fabric. Although this is not very far, it is one of the longest processes in making the quilt. Plus, since I am a fairly tall girl I added some extra length and width, which means cutting out more squares. Once I start on the sewing I plan to follow the Quilt Country Ragtime pattern.

Photography by Kathryn Slack
With the cold winter days among us, I cannot wait until I'm finished this quilt! Unfortunately, it will have to wait until after final exam season. But until then, here is a video that may help you out if you end up making one for yourself, or perhaps for someone else. They make great Christmas presents, if you start now it might not be too late!

                                                               video by 


Bacon Chipotle


Have you ever had the Baked Bacon Chipotle Penne at Boston Pizza?  If you haven’t you should really try it.  It is amazing!  Since I can’t go to Boston Pizza every time I’m the mood for this I decided to see if it was online.  At first I thought that I would just use Google for this but I have recently signed up on Pinterest and figured that there was bound to be at least one recipe on there.  I was not disappointed.  There were several different recipes that I looked at before settling on a recipe called Chipotle Cheesy Bacon Penne.  It looks really good.  I am sadly disappointed that I don’t have everything that I needed to make this because I really really want some.


Ingredients:

-4 cups of uncooked Penne pasta
-1 large tomato Diced
-1 can of sliced mushrooms drained or fried fresh mushrooms
-6 to 8 slices of bacon diced and then fried to make fresh bacon bits (drain off the fat on a paper towel)
-2 cups of Tex Mex shredded cheese
-4 green onions chopped

Sauce Ingredients:
-2 teaspoons of minced garlic (i use jarred garlic)
-3 tablespoons of margarine or butter
-2 tablespoons of flour
-1/4 teaspoon of pepper
-1/2 teaspoon of Mrs Dash Chipotle Seasoning
-2 1/2 cups of 2% milk
-2 cups of Tex Mex cheese shredded

I am definitely going to try this and for any of you who have had this at Boston Pizza (and even those of who you haven’t) should too.  I however won’t be putting mushrooms in because I don’t like them.  

Personal Christmas Ornaments

I'm sure many of us have the regular Christmas balls on our trees. These ornaments are classic; however, sometimes it is nice to add some personal touches to them.

To give some background for my inspiration to do this I will explain why I felt the need to decorate the Christmas decorations. My roommates and I bought a tree off Kijiji that was thirty dollars and included lights and ornaments. It was a steal of a deal, but it looks like it is lacking in holiday cheer. So I took some of the plain Christmas balls and made them a little bit more festive.
Our sad little tree
photography by Kathryn Slack
The supplies that I used included a makeup sponge, acrylic paint, a hot glue gun, lace, and ribbon. First, I used the sponge and dabbed the paint all over the ornament.  I held it by the top knob so I could paint the whole ball at once. Then I used my hair dryer to dry the paint so it didn't get wrecked when I put it down on the table.

Supplies
Photography by Kathryn Slack
Next, I used a hot glue gun to secure the lace onto the ornament. I used the lace that had a slight circular shape to it so that it laid flat. I wished I would have had some glitter or jewels to add to it because it looks a little plain.

On a red ornament I used the hot glue gun again to secure some ribbon on to make a bow. I put a dab of hot glue on the back and then wrapped the ribbon around to the front. I tied the bow and then cut the ends off to make it look neater. Some buttons would have been cute to add to this one in the center of the bow.
New and Improved Ornaments
Photography by Kathryn Slack

Overall, my attempt to add some personality to our Christmas tree was not very effective, but it did result in some cuter Christmas ornaments with some personality.  I suppose over time we will have to take baby steps to making our tree a little more festive! Feel free to comment and leave some ideas!

Tea's the Season

T'is the season for holiday drinks. I look forward to the Christmas season because the holiday flavours are always my favourites. I look forward to candy cane peppermint, creme brulee, cinnamon, gingerbread, and all the rest that go with the Christmas season!

Every year on Christmas Eve my family and I always through a party at our place for our family and friends. Included in this tradition is a festive holiday drink. Last year we made a mulled apple spice drink, where we heated apple juice and cinnamon in a crock pot all night, which was delicious. But this year we are thinking of having more of a specialty drink.

The top consideration for our festive drink this year is a peppermint tea latte. It looks fairly simple to make, because it only has a few ingredients. They are:

Peppermint green tea
Milk 
Vanilla Syrup
photo by Dru Bloomfeild

It seems simple enough. All we have to do is steep the tea and add the milk and syrup. We might even get fancy and froth the milk. If you know of any other holiday drinks that you think we should try leave a comment, I would love to hear from you!


Grilled Cheeses!

It must be winter because all I want is comfort food... and more comfort food. Cookies, pastas, mashed potatoes, roast beef, but more specifically soup! I have already blogged about my leftover turkey soup, and just recently I made a homemade tomato soup. But this is not about soup, this is all about soup's best friend the grilled cheese sandwich!

What goes better with soup than a good-old grilled cheese sandwich? If you ask me it can't be beat. When I was making my tomato soup I couldn't resist the cheesy temptation.

 I am not a chef by any means, but I have to admit I can make a mean grilled cheese. Over my grilled cheese making years I have uncovered a few tips and tricks to making this delicious sandwich and I've decided to  share my secrets with you.

1. The whiter the bread, the crispier the sandwich
- I find that when I made grilled cheeses with brown bread, they usually end up a strange texture of soggy meets crispy. It may not be the healthiest choice but personally, I find that sourdough bread crisps the best.

2. Add other ingredients
Change things up a bit! Try adding ingredients like tuna, ham, or my personal favourite bacon. Not to state the obvious, but make sure the bacon is cooked before you make the sandwich.

and last but not least...

3. Put a lid over the pan
This is the key to the perfect grilled cheese! Use a clear lid from a pot and cover the pan. This keeps the heat in and melts the cheese faster. I used to find that when I made grilled cheeses I would burn the outsides trying to get the cheese to melt but by using a clear lid it keeps the heat in and also lets me see  if it is burning or not!

ticklememelly:

That’s right, a grilled mac & cheese sandwich. YUM!
photo by ticklememelly
Although I have developed some tricks to making good grilled cheese sandwiches, I still manage to forget them on the stove once I start making them. I still need to figure out how to stop doing that. Once I do, there are some other crafty grilled cheese sandwiches that I want to try like the jalepeno popper grilled cheese, pizza grilled cheese, or maybe when I am feeling extra adventurous the 
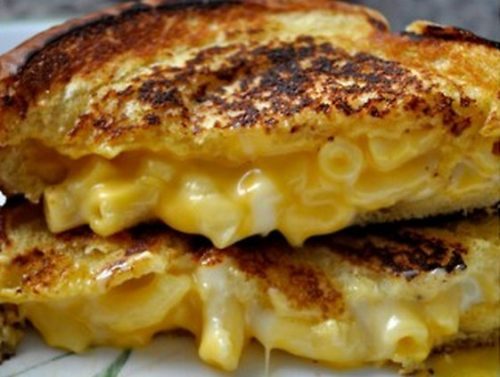
macaroni and cheese grilled cheese! Check them out, they all look delicious!

Telemarketer-Be-Gone

For the past three days I had been getting phone calls from the same telemarketer at the EXACT same time everyday. Therefore, at 8:38 I did not look forward to my phone ringing.

If you know me, you know that I am the type of person that is too nice to say "no" to people. For example, out of those annoying sales kiosks at that try to get you to stop, I am the one that gets roped into stopping. I never buy anything, but I always feel the need to humor them into thinking that I might be interested. Although wasting everyone's time might be worse than just telling them that I'm not interested, I just can't bring myself to do it.

photo by  Mike Licht


Telemarketer's so persistent and, like walking away from those sales people in the mall, I just can't bring myself to just hang up on them. I thought I tried everything. I have said that I am not interested, or that I already had what they were trying to sell me, but for telemarketers we all know that is no excuse. In the back of my mind I know I should just hang up, but then I also know I will just have to deal with them the next day.

Finally, I was down to my last straw and remembered a tip from a friend that I thought I would try. This tip was to tell them that I am on my cell phone. So 8:38 I anxiously anticipated my phone ringing, which it did. I answered to a telemarketer from a bank trying to get me to buy life insurance. Obviously, life insurance is not the number one thing on my list of things to buy. So, I gathered up my courage and told him that I was on my cell phone. And to my disbelief it worked! He said, "Oh sorry, I'll note that this is a cell phone." and hung up!

I've seen a few other things that are a little bit more fun to get rid of telemarketers like handing the phone to a small child and telling them it is Santa, say you are getting the person they want to talk to and then leave the phone up against the radio, or if they pronounce your name wrong, which they normally do, simply say they don't live here because technically they don't!

This Youtube video uploaded unosieta17 is pretty funny, not to give anything away but it is a man pretending to be a homicide investigator while on the phone with a telemarketer.


Movember


Since it’s November this month and every guy I see is sporting some kind of mustache.  Whether it was a nice thick one or one that was barely there they were everywhere.  I found a website that gave you a tutorial for really cool nail designs.  Sure enough there was one on how to make a mustache nail.  Unfortunately for me I have a bad habit of biting my nails so I couldn’t actually turn my nails in to mustaches for November.  Here is what you need if you want to turn your nails in to mustaches (even though November is over). 

-Base coat - Sally Hansen 'Insta Grip'
-Base colour - Essie '473 Sugar Daddy'
-Tips - Barry M '66 Matt White'
-Moustache - Models Own nail pen 'Black'
-Top coat - Seche Vite 'Dry Fast'

Step 1: Apply Base Coat
Apply a thin layer of base coat and allow to dry.
Step 2: Apply First Coat
Apply natural coloured first coat and allow to dry.
Step 3: Add White Tip
Add the white tips to the ends of the nails and allow to dry.
Step 4: Apply Design
Apply your moustache design with a black nail art pen. Using a nail art pen will help you to be more precise with your design. Allow your moustache to dry.
Step 5: Apply Top Coat
Apply a thin top coat, and then allow to dry. This will prevent your nails from chipping.


My goal is to stop biting my nails so that I can do my nails like this next year.