Sunday, September 30, 2012

Old school Cameras


Do you remember a time before digital cameras?  I can say that I vaguely remember my parents having a small black film camera.  There are film pictures all over my house now up until about 2000 give or take a few years.  Digital cameras have become such a norm, especially now that they are on most cell phones, that I don’t think we give much thought to old technologies. 
             In Grade 10 I signed up for the photography option that was offered at my high school.  Some of my friends had taken this course and said that it was so much fun.  When I signed up I had no way of knowing that we had a dark room in the school let alone what a dark room was.  I soon found out when I found out that I would need an old film camera.   I was shocked! This camera wasn’t supposed to be just any camera either we needed a 35mm.  Where was I supposed to get one of these?  Sure the school had several we could rent out but I would have to share it with about 20 other students.  We luckily had a friend that had one. 
            That was four years ago!! I can’t imagine trying find another one now.  However old school these types of cameras are I can say that I find some value of struggle of trying to develop the film.  From fumbling around in the dark to wash the film.  To being careful to hide the paper until it was in the developing solution.  I remember the magic of watching the image appear on the photo paper.  The anger when someone wrecked the film.  I don’t know why but I loved doing film photography (even though I’m not a big picture taking person).  My laptop wouldn't let me scan any of my pictures from Grade 10 so I can't share any with you right now but maybe I can another time.  

BBQ Part 3


Now for everyones favorite part of the meal, dessert time! Because it’s still yummy fruit season we are going to make grilled fruit kabobs. This is a great summer dessert, it’s tasty, refreshing, light and it provides a sweet and juicy finish to your lovely barbecue. 

Shopping list:

Picture from: freefoto.com
  • 6 bananas 
  • 4 mangoes
  • 1 pineapple
  • 1 honeydew mellon
  • 2 limes
  • 2 cans of coconut milk
  • 2 TSP brown sugar
  • 2 TSP vanilla
  • 4 TBSP dark rum
  • 1 TSP ground nutmeg
  • 1/2 cup shredded coconut 
  • Skewers 

How to:

  1. Combine coconut milk with the brown sugar over medium heat in a sauce pan and bring to a boil.
  2. Then reduce the heat to medium and let summer for 15 minutes.
  3. Add nutmeg, vanilla and rum. Let the mixture sit until cooled to room temperature
  4. Refrigerate for 2 hours. (until mixture has thickened) 
  5. Presoak wooden skewers in warm water for 20 minutes. 
  6. Cut the fruit into cubes.
  7. Place the fruit onto the skewers, and put the skewers onto a oiled pan on medium heat.
  8. Cook until grill marks appear on the fruit (2-3 minutes on each side).
  9. Serve warm with coconut sauce.

There you have it, a complete meal plan for your fall barbecue. If you are interested in a few games and party favor ideas, stay tuned 

BBQ Part 2


Now for the main course! You can choose what type of meat you want to barbeque up however I must warn you now, I’m extremely bias. Being born and raised eating good old Alberta beef, my go to is a nice fat juicy steak. If you follow these simple steps you will be on your way to being an expert.

Picture from: FreeFoto.com

Step:1

First thing first, picking that right cut of meat. This can be more difficult than one may think, words such as strip loin, sirloin,  flank, chuck, rib can be overwhelming. An important factor to consider before purchasing meat is to know which affect how tender a piece of meat is. The length of muscle fiber is what makes meat tough. How the meat is handled has a great impact on whether it is tough or tender. If the meat has been handled properly, it will be juicier, resist spoiling longer, and have a better texture. Personally, I would recommend strip loin.  


Step 2: Marinating 

1. Stab the steak with a fork 5-10 times on each side.
2. Take a zip lock bag, double check that it has no holes in it, proceed to place the steaks in the bag.
3.Take a can or bottle of your favorite type of beer and pour it in the bag. 

  1. Add worshire sauce, approximately 3 TBSP
  2. Add 1 clove of garlic per steak into the ziplock bag
  3. Salt and pepper to taste
  4. SHAKE SHAKE SHAKE
  5. Let it sit in the fridge for 2-3 hours
  6. Take the steaks out of the ziplock bag, and place them on a plate. 
  7. Coat the top of the steaks with Montreal Steak Spice.
  8. Light the barbeque - medium heat to high heat.
  9. Once the barbeque is at the right temperature, place the steaks on the barbeque. 
  10. Set a timer:  rare - 4 minutes a side

  
Step 3: Taking the steaks out of the fridge


Step 4: The barbeque process

Before you put the steaks on barbeque you might want to ask your guests how they like their steaks done.
Picture from: freeFoto.com
medium rare- 5.5 minutes       
medium - 6 minutes a side
medium well- 7 minutes a side
well done- 8 minutes a side

Take the steak off the grill, place on a plate and tent it with tin foil for five minutes, this allows the meat to finish cooking and release the succulent juices. Finally ready to serve.

There you have it, a steak cooked to perfection. Your dinner guests wont be able to stop talking about your meat. 

Saturday, September 29, 2012

Cherry Cheesecake??


A non-bake cheesecake, what could go wrong?  Well apparently lots if you live in residence.  First off was the fact that I only had one pan and the night before I had used it to make a casserole.  Luckily my mother loves Tupperware and made me take half of her stock from home so the pan issue was an easy fix.  It was about this time that I decided to look up the recipe since it has been a while since I’ve made a cheesecake.  Upon finding the “perfect” recipe that I happened to have “all” the ingredients I discovered I had no vanilla.  No biggie I decided vanilla is usually optional anyways.  So I began the process of making sure everything that needed to be cold was and whatever needed to be room temperature was.  Once I had the filling done I realized that I usually used a bigger pan and that I was going to have a very thick cheesecake.
Now I began to assemble this seemingly easy dessert.  I meant to take pictures as I went along but before I knew it I was to the point of no return and had the cheesecake put together except for the topping, this is where I run into yet another problem.  I don’t have a can opener, so my non-bake cheesecake is currently chilling in the fridge while I locate someone with a can opener.  I’m a Resident Advisor for MRU so I’m hoping one of my residents has one (I’m betting on one of the girls having one). 
And now for the break down of how this hopefully magnificent cheesecake came to be:
INGREDIENTS
            Crust
            1 cup Graham Wafer Crumbs 250 mL
            1/4 cup Granulated Sugar 60 mL
            1/4 cup Butter or Margarine, melted 60 mL
            Filling

            2 envelopes Dream Whip Whipped Topping
            1 cup Granulated Sugar 250 mL
            1 cup Milk, Cold (as indicated on Dream Whip instructions) 250 mL
            1 pkg (8 oz) Cream Cheese, Softened 250 mL
            1 can (19 oz ) E.D.SMITH Light & Fruity Cherry Fruit Filli


    Since I what I want I veered away from the directions.  I didn’t bake the crust
because I have never done it before and it turns out fine.  I did follow the directions
about making sure that the mixing bowl, beaters, and milk were cold.  This helps the
filling firm better.  When I mixed the filling I did make the Dream Whip first but I
add the sugar until after I had put the milk in.  I also cut up the cream cheese
because it beats together way better. 
      I’m still trying to locate that can opener but when I do I’m planning on freezing this cheesecake for a later date for my residents (possibly a community meeting).  One last tip before I leave you is that no matter how good the filling looks don’t eat a big scoop full.  It leaves you with a huge stomach and puts you off of eating anything else. 

Friday, September 28, 2012

a sweet-tooth turned savory

I'm someone who finds great pleasure in planning a delicious meal, and I love trying out new things. The night before last, as I was making rice with dinner, I decided to make a little extra to satisfy a craving for rice pudding. "This is perfect!" I thought, "it'll be even better than Kozy Shack!" I had heard before that it's better to use leftover rice, so it seemed fitting that I was out of milk. "No problem! I'll pick up some milk tomorrow!"

For the next 24 hours, rice pudding existed as the only reason on Earth to buy milk.

As I ran through my mental lists, they all seemed to end with "oh, and then I'll swing by the grocery store and grab a carton of milk! Better get some milk if I'm to make rice pudding! Isn't rice pudding delicious? Pudding!"

You can only imagine the relief those close to me were going to feel when this current tangent was over.

Finally, the hour had arrived; it was pudding time. I had never tried this before, so I found a recipe online:

- 1 1/2 cups of cooked rice
- 2 cups milk (divided)
- 1/3 cup white sugar
- 1/4 tsp salt
- 1 egg, beaten.
- 2/3 cup raisins
- 1 tbp butter
- 1/2 tsp vanilla extract

I combined the rice with 1 1/2 cups of milk and 1/3 cups sugar and then let it thicken on medium heat for about 15 minutes. Once it was good and creamy, I added the other 1/2 cup of milk, the egg, and the raisins. After a couple of minutes, I removed the pot from the heat and added the butter / vanilla.

It smelled amazing. Topped with cinnamon, it was exactly what I had been longing for. Naturally, a dessert as exciting and highly anticipated as this deserves the perfect tea companion, so we brewed up some chai before finally sitting down to enjoy.

I noticed immediately that there were far too many raisins in this recipe. When they advertise this recipe as "rice pudding", what they mean to say is "raisin pudding". I wasn't offended however; it just so happens that raisins are amoung some of my favourite things. It was divine.

About an hour later though, I started to feel a bit off; my head started to feel heavy, my stomach felt strange, and my energy level had tanked. I was suffering from something I rarely experience now as an adult; the ultimate sugar crash.

Imagine the worst hangover possible, and then imagine never having been drunk in the first place! What gives? Is it true? Have I officially traded in my youthful body for one that can't handle an innocent sugar high?

This morning, I was so turned off by the idea of sugar that I basically ate onions for breakfast. "No waffles for me thanks. Peanut butter? Forget it. I'll start my day off right, with some onions, some butter, and some black coffee."

The next time you see me skipping through the grocery store, anxious to get my hands on a carton of milk, I best be using it to make some kind of macaroni and cheese dish or something. And if you choose to follow in my footsteps, I'd cut down on the raisins.


Thursday, September 27, 2012

It's a jungle in there

It's that time of year again when we start preparing for winter; canning all the remaining summer fruits, bringing in our herbs from outside, and strapping on our winter tires. For us Canadians, the preparation is as much an emotional journey as it is a practical one. Don't be fooled by this generous and beautiful autumn season we've been enjoying; winter is coming.

As someone who thrives on the smell of rain and feeling of sunshine, I find the cold months often put a damper on my level of happiness.  I don't like it when my feet are wet, I don't like waking up in the dark, and I especially don't like that last windy day of fall that knocks all the remaining leaves off the trees. Photosynthesis is a happiness.

In an attempt to hold on to a piece of summer, I'll share today my experience in creating an indoor terrarium. This project is something simple enough for anyone to try, and welcomes itself to all kinds of creativity. Terrarium design truly is limited only by your imagination.

Supplies:
- container of your choosing
- rocks / pebbles
- charcoal
- soil
- moss
- plants
- decorative elements (twigs, figurines)
- spray water bottle

There are two types of terrariums; open-air terrariums and closed terrariums. Since I've opted to make use of tropical plants in this design, my terrarium has a lid and will exist as a closed ecosystem. Open environments are better suited for succulent plants which thrive on drier living conditions.

Before choosing your plants however, it's important to consider what type of container you'll be working with. I've chosen a 1-gallon apothecary jar for my project, but there are countless examples to choose from. If working on a budget, a little resourcefulness can go a long way. Mason jars, fish bowls, and flasks are examples of items that can typically be found around the house and work just as well in creating a happy plant environment.

When deciding what to fill your terrarium with, it's best to choose plants that grow slowly and will be satisfied with whatever amount of sunlight available. I chose a mosaic plant for this project. This plant grows slowly, requires indirect sunlight, and adds some colour to the terrarium with it's red leaves. For some inspiration and other plant ideas, see these top terrarium plant picks.

Once your supplies have been collected, it's time to get terrariun'!

First, place the pebbles and stones at the base of the container. These will allow for drainage and water management beneath the soil.

A layer of charcoal goes in next, which will assist in keeping the water clean. If you've chosen to create an open terrarium for succulent plants, this step isn't as crucial.

Mosses are another great addition to your terrarium as they retain moisture and provide an aesthetic touch. Moss will also promote drainage by preventing your soil from falling into pebbles/stones at the base of your terrarium. Once your charcoal is in, add a thin layer of spaghnum moss before adding your potting soil.

Prepare and insert your plants by shaking off any excess soil and by loosening the roots. Once you've got the plant where you want it in the container, carefully surround and cover the roots in potting soil. You'll want to allow for at least 2-3 inches of soil in your container, so remember to be liberal when putting down your dirt.

If you've chosen to theme your terrarium, it's time to add all the unicorn or wizard figurines you've been anxiously holding on to. I decided to add a little stegosaurus figurine to mine; I can hear him roaring from in between the reindeer moss and twigs I've added.

Caring for your terrarium should be even easier than creating it was! Closed style terrariums require little watering, as the moisture circulates within the container itself. This ecosystem is not too unlike our own, in which water evaporates into the atmosphere and then falls back down again as rain. Open style terrariums will need to be watered more frequently, but not too heavily.

And there you have it! You should be left now with an terrarium that will continue to thrive for years to come, and with any luck, remind you of days spent enjoying a warmer season.

For further examples and how-to's, check out Twig Terrariums, and Disabled World

BBQ- Part 1

Before our nice evenings disappear and the cold winter air moves in, you might want to take advantage of the lovely weather we are experiencing. A great way to do this is to have a few friends over, kick back, grab a beer and enjoy a BBQ'd meal. This week I am going to give you the tips and tricks that will keep your friends ranting and raving about your fall BBQ! So grab that apron, your grilling tools and let's throw another shrimp on the barbie!

Today I am going to give you a few salad ideas to serve at your BBQ. If you are strapped for time, or your boss just wouldn't let you leave the office early Friday, don't stress yourself out, just make one salad. However, personally I find my guests love variety. So if you have the time try to make at least two.

We are going to start off with a personal favorite; The roast potato salad. This is a perfect dish as it complements any, if not all BBQ dishes.

Shopping list:

  • 4 Yukon Gold potatoes
  • 3 Sweet potatoes 
  • 3 TBSP vegetable oil
  • 1/2 TSP
  • 3/4 cup frozen corn
  • 1 sweet red pepper
  • 1 green onion
  • 3/4 cup regular or if you want to feel better about yourself, light mayo
  • 1/3 cup buttermilk
  • 1/4 fresh parsley
  • 2 TBSP lime juice
  • 2 TBSP chipotle peppers 
  • 1/2 TSP ground cumin
  • 1/4 TSP salt
  • 1/4 TSP pepper
Preparation:


Preheat the oven at 425 degrees.
1.Peel and cut the Yukon and sweet potatoes into cubes and place them in a large bowl
2.Stir in oil and salt so the potatoes are covered. Then proceed to spread on a large greased baking sheet and roast 60 -65 minutes.
3.While the potatoes are cooking, in a bowl whisk together, mayo buttermilk, parsley, lime juice, the minced chipotle peppers, cumin and salt and pepper. This creates the dressing
4.Once the potatoes are nicely roasted combine them with the red pepper, green onions. Pour the dressing over top and coat the potatoes.


For the health nuts, a great salad idea is the classic bean salad.

Shopping list:

  • 1 can of drained and rinsed black beans
  • 1 1/2 cup of frozen corn
  • 1/2 cup green onions
  • 3 fresh plum tomatoes (chopped)
  • 1 avocado
  • 1/2 cup fresh cilantro (chopped)
  • 1/4cup fresh basil (chopped)
  • 2 TBSP lime juice
  • 1 TBSP olive oil
  • 1/2 of sugar- to balnce the acidity from the tomatoes and lime juice.
  • salt and pepper to taste
Preparation: 

1. Combine and stir all together. It's just that simple.


If there is a chance of children coming to your BBQ event, the next salad idea is perfect. It's called noodle salad.

Shopping list:
  • 2 TBSP brown sugar
  • 1/4 cup vinegar
  • 1/2 cup oil
  • 1 cup boiling water
  • 2 packages of instant noodles (crushed)
  • 1/4 cabbage (shredded)
  • 2 red onions (sliced)
  • 3 stalks of celery
Preparation:

1. Mix the water and sugar together
2. Add the oil and noodles. Set to cool. 
3. Add the veggies and the stir in the flavor sachets.


There you have it, three simple, great salad ideas. Stay tuned for the main course that will have everyone talking about how juicy your meat is!


Monday, September 24, 2012

Largest Sculpture in the World

Crazy Horse

(Photos By: Clive Moss)


Started in 1948 by Korczak Ziolkowski, the sculpture of the Crazy Horse Memorial began production by Hill City, South Dakota which is around 27km away from the infamous Mount Rushmore Memorial. The monument is being sculpted out of Thunderhead Mountain which is considered sacred land by some Ogala Lakota Aboriginals. Upon completion crazy horse is to be the largest sculpture ever, standing at 563ft high and will have a width of 641ft. With the creation of such a giant project it takes time and the monuments completion date is not expected for decades. Unfortunately the monument is created using private funding only which puts a damper on the progress. When finished the monument will depict Crazy Horse on horse back pointing to the land of his deceased ancestors.


With Crazy Horse being such a hot topic, the monument can always be seen with controversy. To get a real sense of the man behind the sculpture one must first look at Crazy Horse.  He was born around the time of the 1840's and in no time, he made a reputation for himself. Since the 1860's he was fighting the oppression of the white man and he was continually attempting to gain the old way of life for his clan. Known as a fierce and valued warrior Crazy Horse always fought for the good of his people and thus was a perfect candidate for his likeness to be carved into a mountain. Although many feel that this sculpture is a respectful memento of the events that occurred on the land, some from the Lokota tribe don't feel as if the monument production was discussed with them before hand. Regardless of these minor blemishes on the memory, the monument is not only a beautiful addition to the South Dakota skyline but it can help teach about the history and culture that once existed.

Collage of Memories


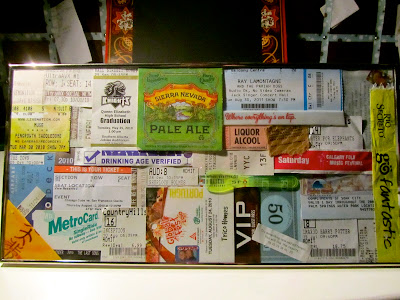
Throughout my life, I have always been a collector of those small items, such as movie stubs and concert tickets, which always trigger memories. For years I have been collecting them in my grandmothers sewing box, watching the old antique box fill up with snippets of my past. Usually it lays closed and forgotten, only opened to add another pile of memories to the darkness. After joining the popular site Pinterest, I have become inspired to not only do more crafting, but to create something meaningful, and useful. Instead of having these items, which I cannot bare to throw away, I thought – why not use them? Somehow I wanted to capture my memories for not only me to enjoy, but for others as well.


After brushing of the dust that had accumulated off my treasured box, I was surprised at the sheer amount of paper that was inside. As I sifted through the pile, memories were brought to the forefront, as if they had happened yesterday. I stared at these items, unsure of where my next step would take me. I looked around my room for inspiration, and saw an empty silver frame that had not yet had a purpose. This is where the idea came to me to collage my memories and put them into the frame, and let the memories replace the photograph that typically would hold the emptiness of the frame.


Slowly I began to fill up the frame, blending my twenty years of life together, mixing old recollections with new ones. As my idea took form, I was overwhelmed with how much I had practically forgotten. I found my ticket stub from a San Francisco MLB game, when the Giants took on the Chicago Cubs, coming out with an amazing victory (they got a grand slam and a splash hit!); my very first wristband that verified I was old enough to consume alcohol; a tiny plastic green spoon from one of my favorite ice cream parlors; Graduation tickets from myself and those close to me. How could these memories have been so far away? I had never forgotten them – they were experiences one never forgets, but they were pushed so far back in my brain that it took these physical fragments of paper to draw them forward. Life lessons were learned, and mistakes were made. From these various memories, I have become who I am today. It was a shock to be surprised with what I found within that box, something I see in my room everyday, but don’t often think about what it contains, and what it means to me. I completed my collage, very happy with how it turned out. Now I am able to look at those memories everyday, and be reminded of my past.


Final Product!

A few days after I had completed my first collage (I am now on number three) I had a few friends over before going out for a birthday party. They immediately took note of my newest furnishing, which started a conversation about how our own friendship has changed over time, triggered by the memories that were brought to us, based on a simple hodgepodge of items most people throw away at their first opportunity. All you need is a frame, a gluestick, and a moment of inspiration, and there you have it – something to look at every day that will remind you of all the good that has happened in your life – and all the excitement that is yet to come.